Author: Joe Leineke

  • FTC’s 2024 Rule: When U.S. Businesses Can Remove Google Reviews

    FTC’s 2024 Rule: When U.S. Businesses Can Remove Google Reviews

    Decorative Google review rule title card

    You can remove a negative Google review only if it breaks Google’s content policies. Genuine, policy-compliant negative reviews stay up, no matter how unfair they feel. Report policy violations right away through your Business Profile or the Reviews Management Tool. If the review is legitimate but harsh, skip the removal fight and respond publicly instead. And steer clear of paying for removal or threatening reviewers. The FTC’s 2024 rule makes both illegal.

    How to Remove Negative Google Reviews: What Actually Qualifies

    Google will not delete a review just because it hurts. It removes reviews only when they violate specific content policies, and the categories are narrower than most business owners expect.

    The eligible categories break down like this:

    • Spam or fake content — reviews from bot accounts, competitors posing as customers, or reviewers who never interacted with your business.
    • Conflict of interest — a current or former employee reviewing their own employer, or a competitor leaving a one-star drive-by.
    • Off-topic content — complaints about a landlord dispute, a political rant, or anything unrelated to the actual customer experience.
    • Hate speech or harassment — slurs, threats, or content targeting someone’s identity.
    • Impersonation — a reviewer pretending to be someone else, including a former customer’s identity theft.
    • Inappropriate images or profanity — visual or written content that violates Google’s content and rating manipulation policies.

    Google’s moderation leans conservative. It runs mostly on automated systems built to catch obvious spam and abuse at scale, which means genuinely fake reviews sometimes slip through, and borderline legitimate complaints occasionally get flagged in error. Neither outcome is personal. It is just the nature of automated review at scale.

    The strength of your case comes down to evidence. Order confirmations, timestamps, screenshots of the offending text, and any record showing the reviewer never did business with you all matter far more than a well-written complaint.

    How to Report a Fake or Policy-Violating Google Review

    Reporting a review correctly takes minutes, but sloppy reports get rejected just as fast as they get filed. Here’s the process:

    1. Open the review in Google Maps or your Business Profile, and click the three-dot menu next to it.
    2. Select “Report review” (or route the report through the Reviews Management Tool if you manage multiple locations).
    3. Choose the specific policy reason. Don’t select “other” when “spam” or “off-topic” applies.
    4. Attach evidence. A screenshot of the review, a note tying it to a policy clause, and any transaction records that prove the reviewer was never a customer.
    5. Submit and note the date, so you can track how long the review sits in pending status.

Pro Tip: Write your report like a policy memo, not a complaint letter. One sentence stating which rule was broken, backed by evidence, gets processed faster than three paragraphs about how the review made you feel.

Avoid mass-reporting reviews you merely dislike. Google’s systems flag accounts that file frequent, low-evidence reports, and that can slow down your legitimate ones.

What Happens if Google Denies Your Report?

Most reports resolve within a few days, but not every outcome favors the business. When Google rejects a report, you get one shot at a formal appeal.

  • Google’s appeal process is a one-time option per decision, so make it count. Include only your strongest evidence, mapped directly to the policy clause you believe was violated.
  • Expect one of a few statuses: decision pending, reviewed with no policy violation found, or escalated for further review. None of these move quickly. Give it one to two weeks before assuming it’s stalled.
  • If the appeal fails and the review is clearly defamatory or fraudulent, a consultation with an attorney is reasonable. Legal action rarely removes a review fast, but it can matter if the content includes false factual claims that cause measurable harm.

What the FTC’s Review Rule Means for Your Removal Strategy

The FTC’s Trade Regulation Rule on Consumer Reviews and Testimonials went into effect on October 21, 2024, and it changes what business owners can legally do about bad reviews.

The FTC can now seek civil penalties for businesses that buy fake reviews, sell them, or use unfair suppression tactics against real ones, according to the agency’s own announcement.

The rule targets three common but risky moves: paying a reviewer to delete or edit a truthful negative review, sending unfounded legal threats to intimidate a reviewer into silence, and orchestrating a wave of fake positive reviews to bury a real complaint. The FTC’s own guidance is explicit that offering compensation to change a truthful review can violate the FTC Act, separate from the new rule entirely.

The compliant path is simpler than it sounds. Document every removal request in writing, keep review-generation practices transparent, and talk to counsel before sending any legal threat. If you suspect extortion (someone demanding payment to delete a bad review), save every message and report it. That’s evidence, not something to negotiate quietly.
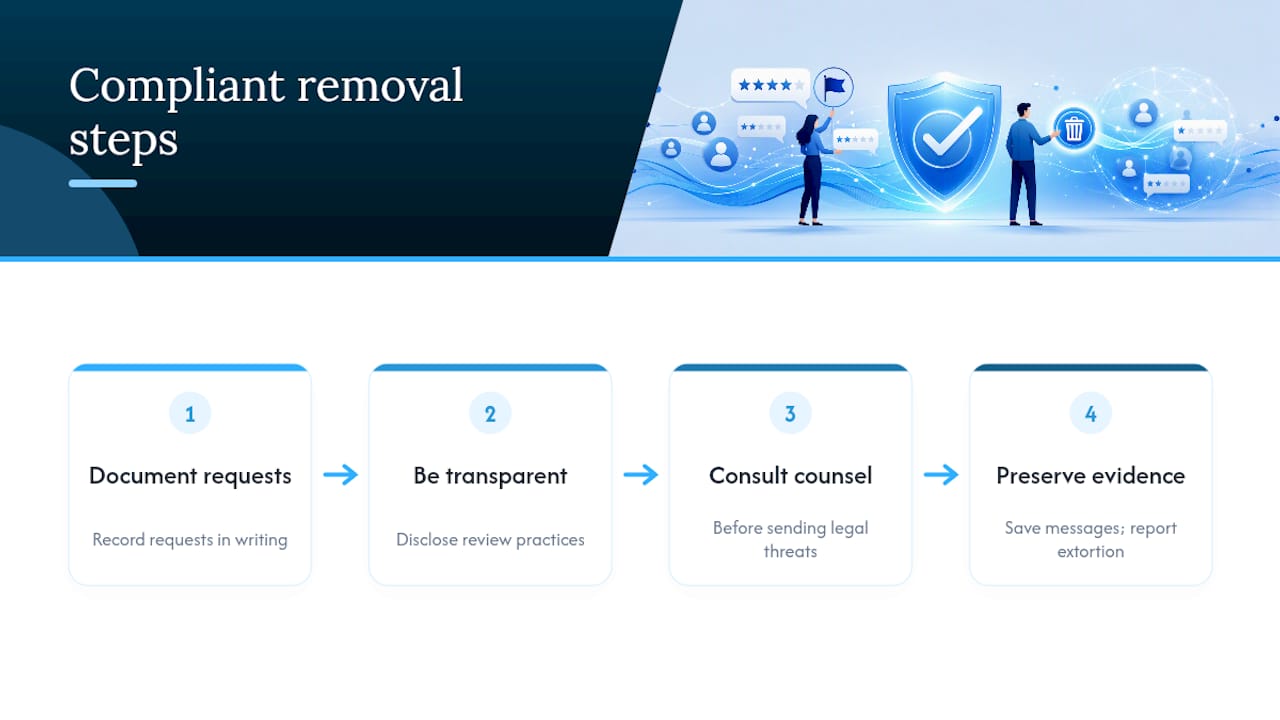
Compliant review removal process diagram

Responding to Negative Google Reviews You Can’t Remove

Most negative reviews that survive a report are simply real. A customer had a bad experience, and Google correctly decided that opinion, however unwelcome, does not violate policy. This is where response quality matters more than removal attempts.

A solid public response does four things: acknowledges the complaint, states you looked into it, offers to resolve the issue offline, and invites the reviewer to follow up. Avoid language that reads as an admission of fault. “We’re sorry this happened” works. “We should have caught this before it shipped” can become a liability in a dispute.

  • Reply within 24 to 48 hours. Delayed responses read as indifference.
  • Never offer payment or a discount specifically to get the review changed. That crosses into the same territory the FTC now polices.
  • Once resolved, you can invite the customer to update their review voluntarily, but never make the update a condition of the resolution.
  • Keep fresh, unprompted reviews coming in. A systematic review-generation strategy pushes older negative reviews further down the page and gives new visitors more recent, balanced context.

Pro Tip: Post photos and Business Profile updates regularly. An active profile with recent, positive activity does more to offset one bad review than any removal attempt ever will.

When It’s Time to Bring in a Specialist

Joe has spent years watching business owners fight review battles they were never equipped to win alone, largely because reporting is a documentation exercise, not an emotional one. EngageZing’s business listings and profile management work centers on exactly that discipline: mapping evidence to policy language instead of hoping volume or persistence changes Google’s mind.

Bringing in outside help makes sense when a business faces repeated fake-review attacks, a Google-imposed restriction on its profile, evidence collection that’s grown too complex to track internally, or simply not enough staff time to do it right. EngageZing pairs review-generation systems with hands-on profile services so businesses build a review base strong enough that a stray negative review barely registers. Every method used follows Google’s policies and the FTC’s rules. No paid removals, no manufactured praise, no shortcuts that create legal exposure down the line.
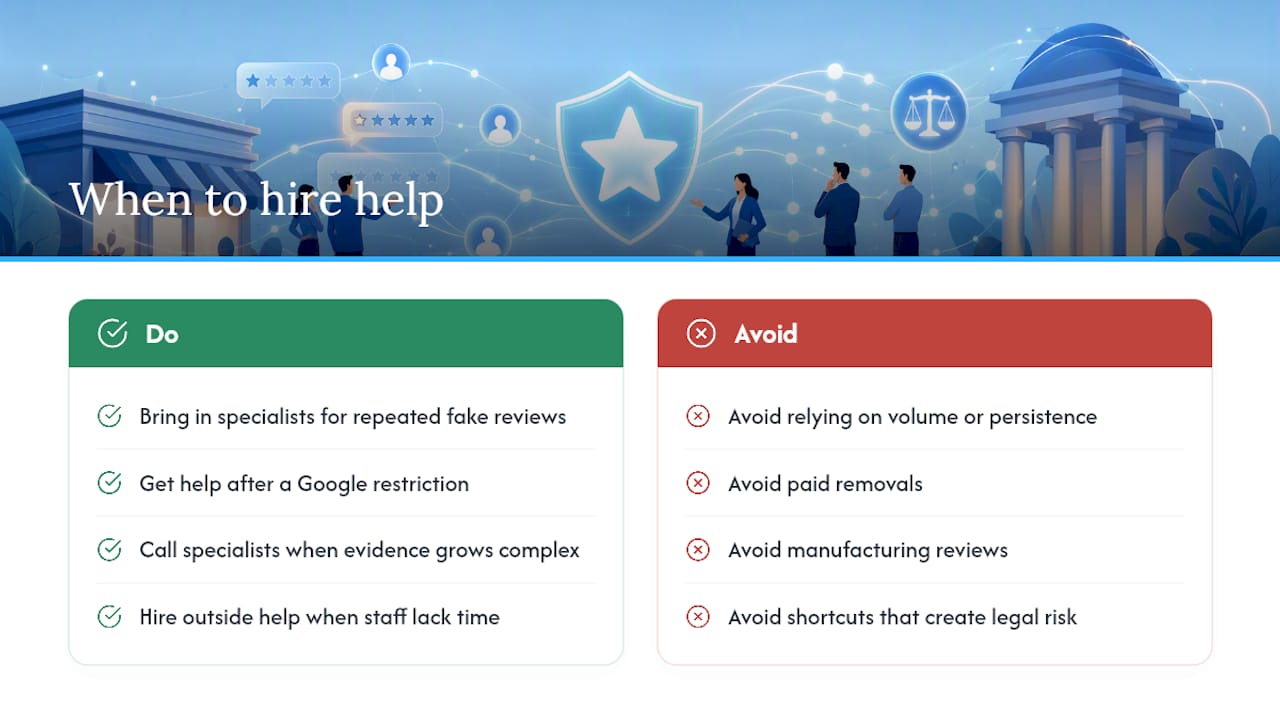
When It's Time to Bring in a Specialist — overview diagram

The Real Problem Isn’t the Bad Review. It’s the Weak Response System

Most advice on this topic treats review removal as the goal, and that’s backwards. Removal is a narrow tool that applies to a narrow slice of cases: fake accounts, competitor sabotage, off-topic rants. For the overwhelming majority of negative reviews, the ones written by real, dissatisfied customers, there is no removal path, and pretending otherwise wastes time better spent elsewhere.

The businesses that come out ahead treat a bad review as a visibility problem, not a legal one. One negative review buried under fifty recent, genuine positive ones barely moves the needle on conversion. One negative review sitting alone on a profile with six total reviews is a crisis. The fix in that second case is never a Google appeal. It’s volume, consistency, and a response that shows a real human is paying attention.

The FTC’s 2024 rule also changes the calculus in a way few owners have internalized yet: the aggressive removal tactics some reputation firms quietly used for years (cash-for-deletion, legal intimidation) now carry real civil penalty exposure. Compliance isn’t the cautious option anymore. It’s the only defensible one.

Where to Verify This Information

This article is general information, not a substitute for advice from a qualified lawyer. Consult a qualified legal professional about your own circumstances before acting on anything here.

Frequently Asked Questions

Can I remove a negative Google review?

Only if it breaks Google’s content policies: fake accounts, competitor spam, impersonation, off-topic rants or prohibited content. Genuine negative reviews stay up no matter how unfair they feel.

Is paying someone to remove reviews legal?

No. The FTC’s 2024 rule on consumer reviews prohibits paying for or threatening the removal of truthful negative reviews, and the penalties are real.

What should I do about a bad review I cannot remove?

Respond publicly, briefly and professionally, name the remedy you offered, and build review volume so the negative one reads as an outlier rather than the pattern.

Share This Article

Found this useful? Send it to another owner who is still fighting a review they cannot legally remove.

Share on Facebook · Share on X · Share on LinkedIn · Share on Pinterest

Want More Information? Let’s Talk.

If you would rather not take this on yourself, we handle it for you. Our Review Generation & Reputation service takes care of the setup and the ongoing work, then reports back so you can see exactly what changed. You keep running your business; we keep this moving.

Call us at 631-825-9464 or reach out here. No pressure, no obligation, and you can ask us anything — including whether this is even worth doing for a business your size.

Looking ahead, request your free roadmap analysis and we will map out a 12-month plan to close the conversion leaky bucket so more of the customers you already reach turn into booked work.


Written by Joe Leineke · Content on this blog is generated with AI assistance and independently reviewed and fact-checked by human marketing professionals for accuracy and quality.
  • Rank Higher in 30–90 Days: 2026 Google Business Profile Checklist

    Rank Higher in 30–90 Days: 2026 Google Business Profile Checklist

    Rank Higher in 30–90 Days: 2026 Google Business Profile Checklist

    Verify and fully complete your Google Business Profile. That single move, done right, is the fastest and highest-leverage step toward better local visibility in 2026. From there, three levers do most of the work: your primary category, a steady flow of reviews, and a genuinely complete profile. Before touching anything else, confirm you still have ownership access and that your primary category matches what customers actually search for.


    TL;DR:

    • Claim and verify your Google Business Profile promptly using the appropriate verification method to ensure control over your listing and enable optimization.
    • Maintain consistency in your NAP data, hours, and attributes across your website and all directories to boost trust signals and local relevance signals.
    • Prioritize selecting the most specific, relevant primary category and accurately list services and products to improve your appearance in local search results.
    • Regularly update photos, videos, and posts to demonstrate active management, as Google favors profiles with fresh content for higher visibility.
    • Monitor your profile weekly for unauthorized changes, reviews, and suggested edits, and run full audits every 90 days to sustain and improve local search rankings.

    What Is Google Business Profile Optimization, Exactly?

    Google Business Profile optimization means deliberately configuring every field, feature, and signal Google offers on your listing so it ranks higher in local search and the Map Pack, and converts more of the people who find it. That includes your business information, categories, photos, reviews, posts, and messaging settings. It’s often called Google My Business optimization out of habit, since Google renamed the product a few years back, but the mechanics haven’t changed: complete profiles that stay active consistently outperform sparse, neglected ones.

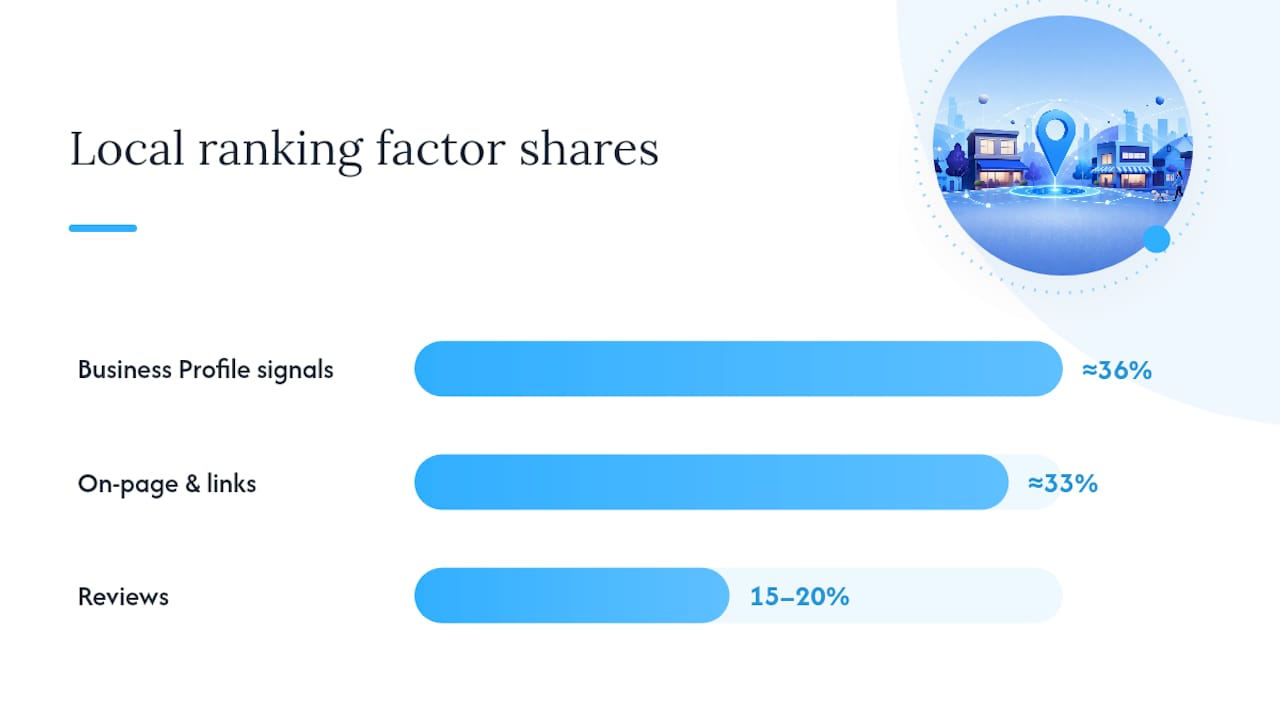
    Google says its local results depend primarily on three factors: relevance, distance, and prominence, and a fully completed profile is how you signal relevance in the first place. Industry analyses of Local Pack ranking factors estimate that Business Profile signals now account for roughly 36% of what determines who shows up in the 3-pack, ahead of on-page and link signals at around 33% and reviews at 15 to 20%. That’s not a small edge you can ignore while you focus on your website. It’s close to the biggest lever you have.

    Estimated local ranking factor shares

    Verify and Claim Your Profile: Setup Essentials

    You cannot optimize what you don’t control. If you haven’t claimed your listing, or you inherited one from a previous owner or agency, start there before anything else.

    Google offers several verification paths, and which one you get depends on your business category and history with Google:

    • Postcard verification: Google mails a code to your business address, typically arriving within five business days.
    • Phone verification: available for some categories, delivering a code via text or automated call.
    • Email verification: offered to businesses that already have a verified website and matching domain.
    • Instant verification: automatic for businesses already verified through Google Search Console with a matching address.

    Once verified, set up owner and manager roles inside the Google Business Profile dashboard rather than sharing one login among staff. Enable two-factor authentication on the Google account tied to the listing through Google’s account login, and keep a documented recovery email in case the primary owner leaves the company.

    Google allows public users to suggest edits to listings, including hours and addresses, and those changes can go live without your approval. Check your profile weekly for suggested edits you didn’t make. A competitor, a confused customer, or an automated scraper can quietly change your hours or phone number, and you won’t notice until a customer complains about showing up to a locked door.

    Complete Business Information: NAP, Hours, Attributes, and Service Area

    Your name, address, and phone number, commonly called NAP, needs to match exactly across your website, your profile, and every directory that lists you. Google cross-references this data as a trust signal, and inconsistencies (a suite number here, an abbreviated street type there) weaken it.

    1. Format NAP identically everywhere. Use the same abbreviation style, the same phone format, and the same suite or unit notation on your website footer, your profile, and every citation source.
    2. Set special hours ahead of holidays. Google lets you schedule holiday and special hours in advance; businesses that skip this show as “open” on days they’re closed, which damages trust fast.
    3. Configure service area correctly for non-storefront businesses. If you’re a mobile service, plumber, or contractor without a public-facing storefront, hide your exact address and define a service area by city or zip radius instead.
    4. Enable attributes that match your actual operations. Options like “wheelchair accessible entrance,” “online appointments,” “identifies as women-owned,” or “outdoor seating” aren’t decorative. Customers filter by them, and Google uses them to match specific queries like “wheelchair accessible restaurant near me.”

    Skipping the attributes section is one of the most common gaps found in listing audits, mostly because it’s buried a few clicks deep and easy to forget once the basics are filled in.

    Categories, Services, and Description: Set Your Relevance Footprint

    Your primary category is arguably the single most consequential field on your entire profile. Pick the wrong one, and Google may never surface you for the searches that actually convert, no matter how many reviews you collect.

    • Choose the narrowest accurate category, not the broadest. “Italian Restaurant” beats “Restaurant” if that’s genuinely what you serve. Vague categories dilute your relevance signal instead of strengthening it.
    • Avoid stacking secondary categories that don’t apply. Adding every remotely related category to appear in more searches usually backfires by confusing Google’s relevance matching.
    • Use the services section to cover specific search phrases your primary category doesn’t. A plumber’s primary category won’t rank for “water heater installation” unless that exact service is listed as a distinct entry.
    • Write your business description as plain, specific prose, not a keyword list. Mention your location, your core service, and what makes you distinct, in sentences a person would actually say out loud.

    Google’s own systems, and increasingly AI-driven summaries layered on top of local search, extract meaning from structured fields like services and descriptions more reliably than from your homepage copy. A checklist-based GBP audit found that fixing category and services entries alone produced measurable ranking movement within 30 to 60 days for most businesses. Practical optimization guides consistently flag category selection and NAP consistency as the two fields with the most outsized impact relative to effort.

    Photos and Video Strategy: What to Upload and How Often

    A profile with rich photos gets noticeably more direction requests and website clicks than a bare one, according to aggregated GBP performance data. Photos aren’t decoration. They’re a conversion tool sitting right in the search results.

    • Cover photo and logo: high resolution, properly cropped, updated if your branding or storefront changes.
    • Interior and exterior shots: help customers recognize your location before they arrive, which reduces no-shows and confused calls.
    • Team photos: build trust, especially for service businesses where customers invite someone into their home.
    • Product or menu photos: directly influence purchase decisions before a customer even clicks through.
    • Short video: a 30-second walkthrough or service demo tends to outperform static images for engagement.

    Name your image files descriptively before uploading (downtown-plumber-water-heater-repair.jpg rather than IMG_4021.jpg), and geotag when your camera or phone supports it. Aim to add at least one new photo every week; stale, unchanging photo sets are a quiet signal that a listing isn’t actively managed.

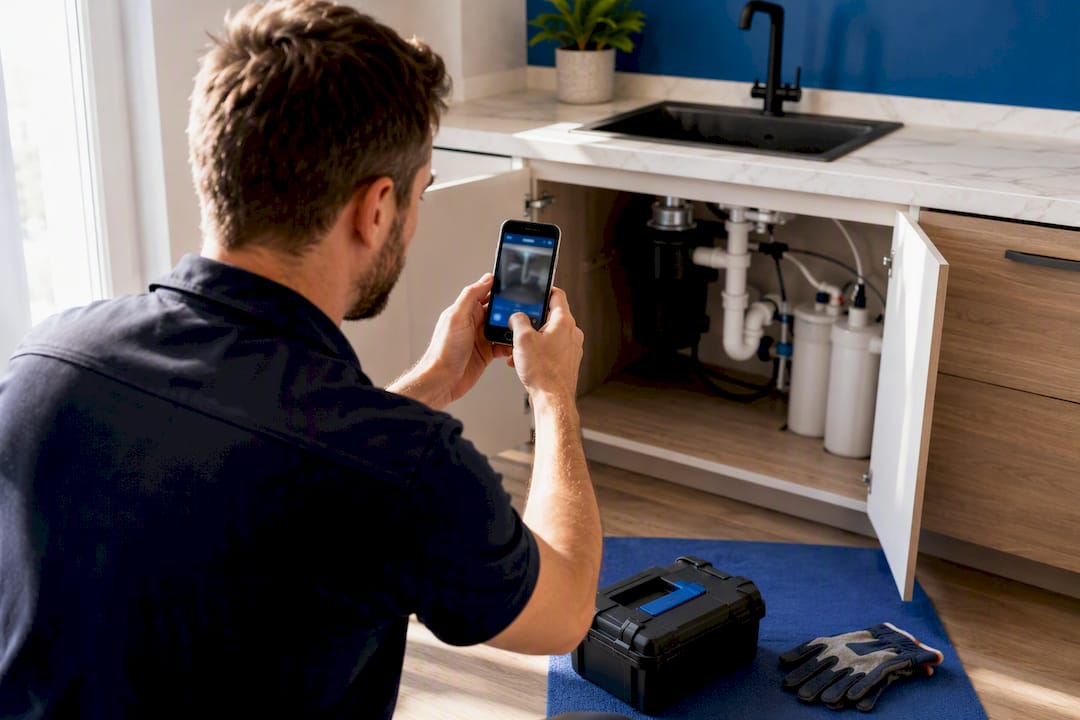
    Pro Tip: Ask every technician or team member to snap one photo per job with their phone. You’ll never run out of authentic content, and it beats a single annual photoshoot for keeping the profile visibly active.

    Technician photographing completed service work

    Reviews and Reputation: Acquisition, Velocity, and Response

    Reviews influence roughly 15 to 20% of your Local Pack ranking weight, but their bigger effect is on conversion. A customer scrolling the Map Pack decides between three nearly identical businesses based almost entirely on stars and recent review text.

    1. Ask at the moment of highest satisfaction, not days later. Right after a completed job, delivery, or checkout is when customers are most willing.
    2. Use text and email requests over generic review-site links. A direct link to your Google review form removes friction that kills response rates.
    3. Prioritize steady velocity over occasional bursts. A trickle of two or three reviews weekly reads as more authentic to Google’s systems than fifty reviews in one week followed by silence for months.
    4. Encourage descriptive reviews. A review that mentions the specific service performed carries semantic weight that helps you match future search queries for that exact service.
    5. Respond to every review within 48 hours, positive or negative. Thank positive reviewers by name and mention the service; address negative reviews calmly, offer to resolve the issue offline, and never get defensive in public.

    Review velocity check: Businesses that automate post-service review requests through SMS or email, triggered within a day or two of job completion, tend to sustain a steadier flow than those relying on manual, occasional asks.

    Consistency here beats intensity. A business collecting three or four reviews a week for a year will outperform one that begs for fifty reviews once and never follows up.

    GBP Posts, Q&A, and Messaging: Engagement Features That Signal Activity

    Posts, Q&A, and messaging exist specifically to keep your profile looking active, and Google rewards active profiles with more visibility.

    • Publish posts weekly at minimum: offers, events, new products, or seasonal updates all count, and each one carries a fresh timestamp Google can weigh as a freshness signal.
    • Write posts as short, specific announcements, not vague marketing copy. “20% off water heater installation through March 31” beats “Check out our great deals.”
    • Seed your own Q&A section with the five or six questions customers actually ask most (parking, walk-ins, payment methods, service area) and answer them yourself before a stranger posts something inaccurate.
    • Enable messaging and set a real response expectation. A profile that lets customers message directly, and answers within an hour or two, converts better than one that goes silent for days.

    Structured, concise answers in Q&A and services entries are increasingly what AI-driven local summaries pull from directly, which makes clear, factual answers more valuable than clever marketing language in this specific spot.

    Products, Services, and Bookings: Populate Entries for Relevance

    Every service or product entry is a small, structured opportunity for Google to match your listing to a specific search.

    • Write service names the way customers search, not the way your invoice software labels them. “Emergency drain cleaning” beats “Drain Service Type B.”
    • Use product listings for businesses with retail-style offerings (specific items, prices, and photos), and use service entries for anything quoted or scheduled.
    • Add a short description to every entry rather than leaving fields blank; even one sentence gives Google more to match against.
    • Link your booking or scheduling tool directly if you take appointments, so customers can book without leaving the search results page.

    A landscaping company that lists “lawn mowing,” “mulch installation,” and “fall cleanup” as distinct entries, each with a sentence of description, will out-rank a competitor who lists one generic “landscaping services” line, all else being equal.

    Advanced GBP SEO: Citations, Schema, and Behavioral Signals

    Once your on-profile fields are solid, the next gains come from signals outside the profile itself that reinforce what Google already sees.

    • Fix citation consistency first. Data aggregators and directories like Yelp, Apple Maps, and industry-specific listing sites need to match your NAP exactly; inconsistent citations quietly undermine prominence.
    • Add LocalBusiness schema markup to your website, including your name, address, phone, hours, and geo-coordinates, so your site and profile reinforce each other rather than existing in isolation.
    • Optimize your primary photo and offer posts for click-through, since higher CTR from the Map Pack is itself a behavioral signal Google factors into prominence.
    • Link your website’s location page to a landing page optimized for the same search terms your profile targets, closing the loop between the two.

    EngageZing’s Search Box Optimization approach focuses on exactly this handoff between profile and website, since a listing that ranks well but sends traffic to a mismatched page still loses the customer. For businesses relying heavily on map clicks, a dedicated Near-Me Search Boost push can tighten that click-through gap further.

    Monitoring, Audits, and Guardrails: Protecting Your Profile

    Optimization isn’t a one-time project. Profiles drift: hours get edited, categories get suggested-away, and review velocity stalls without anyone noticing for weeks.

    1. Check weekly for suggested edits, new reviews awaiting response, and unusual activity.
    2. Run a full audit every 90 days covering every field, your entire photo library, your last quarter of posts, review velocity trends, and citation consistency across directories.
    3. Set calendar alerts for holiday hours updates before every major closure period.
    4. Contact Google Business Profile support directly when you spot unauthorized changes you can’t revert yourself, and keep screenshots or documentation of the original correct information ready to speed up resolution.

    Pro Tip: Keep a simple spreadsheet with your correct NAP, hours, and category logged in one place. When something drifts, you’re comparing against a documented baseline instead of guessing what it used to say.

    Timeline, Expected Results, and Costs

    Some changes show up fast. Others take patience.

    • Days: category corrections, hours fixes, and new photos can shift impressions almost immediately.
    • 30 to 90 days: services entries, description rewrites, and consistent posting tend to produce measurable Local Pack movement in this window.
    • Months: review velocity and citation consistency build prominence more slowly, but the gains tend to stick.

    Cost reality check: DIY optimization costs nothing but your time, roughly a few hours weekly for maintenance. Managed services typically combine a one-time setup fee with an ongoing monthly subscription that covers review generation, posting, and monitoring, since consistent upkeep matters more than the initial setup.

    Frequently Asked Questions

    How long does it take to see results from profile optimization?

    Category, hours and photo fixes can move impressions within days. Services entries, description rewrites and consistent posting usually produce measurable Map Pack movement in 30 to 90 days. Review velocity and citation consistency build more slowly, but those gains tend to hold.

    Do I really need to fill in the attributes section?

    Yes — it is one of the most commonly skipped fields and one of the easiest wins. Customers filter by attributes, and Google matches them to specific searches like “wheelchair accessible restaurant near me.” Leaving it blank hands those searches to a competitor.

    How often should I add photos?

    At least one new photo a week. A photo library that never changes reads as a listing nobody looks after. Ask each technician or team member to snap one photo per job and you will never run short of authentic content.

    Can someone else change my listing without permission?

    They can suggest edits, and Google sometimes publishes them without your approval. Check your profile weekly for changes you did not make. If a competitor or a scraper alters your hours or phone number, you want to catch it before a customer shows up to a locked door.

    Share This Article

    Worth passing on to another owner who is still treating their profile as a set-and-forget listing.

    Share on Facebook · Share on X · Share on LinkedIn · Share on Pinterest

    Want More Information? Let’s Talk.

    Most of this checklist is not hard. It is just easy to postpone when you are the one answering the phone. Our Business Listings & Voice Search service keeps listing accuracy, categories, services and weekly posting handled for you, and monitors for unauthorized edits so nothing drifts. Pair it with Review Generation & Reputation and the two heaviest levers in local ranking are covered without adding another task to your week.

    Call us at 631-825-9464 or get in touch here. Free advice, no obligation, and we will tell you honestly whether your profile needs work or is already in good shape.

    Looking ahead, request your free roadmap analysis and we will map out a 12-month plan to close the conversion leaky bucket so more of the people already finding you turn into booked work.


    Written by Joe Leineke · Content on this blog is generated with AI assistance and independently reviewed and fact-checked by human marketing professionals for accuracy and quality.
  • SMS First Automated Review Requests: Agency Checklist, 1 to 2 Hour Delay

    SMS First Automated Review Requests: Agency Checklist, 1 to 2 Hour Delay

    SMS First Automated Review Requests: Agency Checklist, 1 to 2 Hour Delay

    Enable trigger-based, SMS-first automated review requests with a one to two hour delay and a single follow-up. That combination consistently produces the strongest response rates and the fastest lift in review volume when you monitor it weekly. Set it up today, or schedule a free analysis with EngageZing to have it configured for you.


    TL;DR:

    • Sending review requests one to two hours after service completion yields higher response and review volume than instant or next-day timing.
    • SMS requests achieve three to four times higher response rates than email, with most messages being opened within minutes.
    • Automating review requests across multiple locations or reviews requires a trigger, delay, satisfaction gate, and follow-up, with consistent capture of customer details essential.
    • Monitoring funnel stages weekly helps identify issues in trigger, delivery, click-through, or completion rates, ensuring continuous campaign performance.
    • Most failures stem from outdated links, missed trigger timings, or skipping the satisfaction gate, which can be fixed with regular oversight and proper setup.

    Why Automated Review Requests Matter for Local Visibility and Revenue

    Review velocity, meaning how many fresh reviews a business earns per month, directly shapes local pack rankings and consumer trust. Businesses that consistently generate 15 or more reviews a month tend to see measurable improvements in local search positioning within a few months. Manual asking rarely sustains that pace because it depends on staff remembering to ask, and staff forget.

    Business owner sending SMS review request on smartphone

    SMS closes that gap. It delivers three to four times the response rate of email when timed correctly, mainly because text messages get opened within minutes while emails sit in an inbox for days.

    Timing compounds the effect. For most local service businesses, a request sent one to two hours after job completion, while the experience is still fresh, outperforms same-day or next-day sends.

    The revenue stakes are real: research from Harvard Business School and vendor data both link star-rating changes to measurable revenue shifts for independent businesses. A single lost star can cost more in lost bookings than most owners assume.

    • Consistent monthly review volume improves local pack visibility over time
    • SMS delivers substantially higher response rates than email for review requests
    • A one to two hour delay after service completion captures peak customer satisfaction
    • Star-rating shifts correlate with measurable changes in revenue and conversion

    Automated systems that ask every customer, every time, typically generate several times the review volume of manual asking because they remove the inconsistency of relying on a busy employee to remember.

    How Do You Set Up an Automated Review Request Workflow?

    The workflow has five moving parts: a trigger, a delay, a message sequence, a satisfaction gate, and a follow-up. Get these right and the rest is largely maintenance.

    1. Pick your trigger. Job completion is the strongest trigger for service businesses because it fires at the exact moment satisfaction peaks. Ecommerce sellers typically trigger off delivery confirmation instead.
    2. Set the delay. A one to two hour window after the trigger event outperforms instant sends, which can feel robotic, and next-day sends, which lose the emotional peak.
    3. Send SMS first. Lead with a short text message. Only fall back to email if the customer has no mobile number on file or has opted out of texts.
    4. Route through a satisfaction gate. Ask a simple one-tap question first: “How was your experience?” Positive responses get a direct link to your Google review page. Negative responses route to a private feedback form and trigger an internal alert to your operations team.
    5. Schedule one follow-up. Send a single reminder three to five days after the initial request to anyone who hasn’t clicked through. A second follow-up rarely adds value and often annoys customers.

    This gated structure, an SMS request followed by an email fallback, reduces the odds of negative reviews landing publicly while still capturing the feedback you need internally.

    Pro Tip: Keep the satisfaction gate question binary, not a rating scale. A five-point scale adds friction and cuts your click-through rate before the customer even reaches the review link.

    SMS vs. Email: Choosing Channels and Staying Compliant

    SMS wins on speed. Most text messages get read within three minutes, while email open rates lag for hours or never happen at all. Email still earns a place as your fallback channel for customers without a mobile number or who’ve opted out of texting.

    Keep your message short: one line, the customer’s first name, a specific reference to the service, and a direct link to your review page. Skip the paragraph of gratitude. A cluttered message reads like spam and gets ignored.

    • SMS: fastest response, best for time-sensitive requests, requires explicit opt-in under TCPA rules
    • Email: slower but zero-cost, works as a dependable fallback, must include a one-click unsubscribe under CAN-SPAM
    • Both channels need a clear opt-out path baked into the automation, not bolted on later
    • Shortened links can trigger spam filters on some carriers, so test your link format before scaling

    Compliance isn’t optional. Sending unsolicited texts without consent risks fines and carrier blocking, and a missing unsubscribe link in email violates CAN-SPAM. Build consent capture into your intake process from day one.

    Which Integration Path Fits Your Business?

    Three paths exist, and the right one depends on your technical comfort and how many locations or reviewers you manage. Built with n8n or Zapier, a no-code workflow can trigger on job completion, add a delay node, send SMS through a provider like Twilio or SimpleTexting, and branch unhappy responses into a private form, all without writing code.

    • Native platform tools: Many field service and CRM platforms include built-in review request features, often the fastest path if you’re already using one.
    • No-code automation: Zapier or n8n connect your job management software to a texting provider and your review link, giving you full control over timing and message copy.
    • Agency-managed setup: EngageZing configures and monitors the entire pipeline, useful when you run multiple locations or lack time to maintain the workflow yourself.

    Whichever path you choose, your automation needs four data fields to function: customer name, phone number, a unique job or order ID, and the correct review link for that location. Missing any one of these breaks the personalization or sends customers to the wrong Google Business Profile.

    What Metrics Should You Track and What’s Healthy?

    A review request moves through five funnel stages, and tracking each one tells you exactly where the process breaks when results disappoint.

    Funnel stageWhat it measuresHealthy benchmark
    Trigger ratePercent of completed jobs that queue a request90% to 95%
    Delivery ratePercent of messages that reach the customer95% to 99%
    Click-through ratePercent who tap the link in the message35% to 45%
    Completion ratePercent who finish leaving a review after clicking50% to 65%
    Overall conversionCompleted reviews as a percent of total requests sent15% to 25%

    Check trigger rate first: if jobs aren’t queuing requests, look at your integration, not your message copy. If delivery is weak, check for bad phone numbers or carrier filtering. If clicks are low but delivery is strong, your message copy or timing needs work. If people click but don’t finish, the review link probably points to the wrong page or asks for too many steps.

    • Trigger rate below 90% points to a broken integration, not a messaging problem
    • Low click-through with strong delivery usually means weak timing or copy
    • Strong clicks but weak completion almost always trace back to link destination

    What Mistakes Quietly Kill Review Automation?

    Most failed automations don’t fail loudly. They just quietly underperform for months while nobody checks the numbers.

    • Sending customers to the wrong review link, often an outdated Google Business Profile from a closed location
    • Firing the request instantly or waiting until next-day, both of which underperform the one to two hour window
    • Skipping the satisfaction gate, which lets unhappy customers post publicly instead of routing privately
    • Stacking more than one follow-up, which drives opt-outs faster than it drives reviews

    Deliverability quietly sinks more campaigns than bad copy does. Register your sender under 10DLC if you’re texting from the United States, protect your sender reputation by avoiding spammy link shorteners, and test your links on multiple carriers before scaling.

    Pro Tip: Check your funnel numbers every Monday morning. A five-minute weekly glance catches a broken trigger before it costs you a month of missed reviews.

    Business owner monitoring marketing funnel charts on wall

    Frequently Asked Questions

    When should the review request actually go out?

    One to two hours after the job is marked complete. That window catches the customer while the experience is still fresh, and it outperforms both instant sends and next-day emails in response rate.

    Is texting customers for reviews allowed?

    Yes, with consent. You need explicit opt-in under TCPA rules before you send marketing or request texts, so capture permission at intake. Keep a clear opt-out in every message and honour it immediately.

    How many follow-ups should we send?

    One. A single reminder three to five days after the first message catches most of the people who meant to respond. A second follow-up tends to generate opt-outs rather than reviews.

    What if a customer had a bad experience?

    Route them through a short satisfaction gate before the review link. Unhappy customers land on a private feedback form instead, which gives you a chance to fix the problem and keeps the complaint out of public view.

    Share This Article

    Found this useful? Send it to another owner who is still asking for reviews by hand.

    Share on Facebook · Share on X · Share on LinkedIn · Share on Pinterest

    Want More Information? Let’s Talk.

    If you would rather not build and babysit this yourself, we handle it for you. Our Review Generation & Reputation service sets up the trigger, the delay, the satisfaction gate and the follow-up, then monitors the funnel for you and reports back weekly. You keep running your business; we keep the reviews coming in.

    Call us at 631-825-9464 or reach out here. No pressure, no obligation, and you can ask us anything — including whether this is even worth doing for a business your size.

    Looking ahead, request your free roadmap analysis and we will map out a 12-month plan to close the conversion leaky bucket so more of the customers you already reach turn into booked work.


    Written by Joe Leineke · Content on this blog is generated with AI assistance and independently reviewed and fact-checked by human marketing professionals for accuracy and quality.
  • $200–$39,000: 2026 Itemized Costs for US Small Business Websites

    $200–$39,000: 2026 Itemized Costs for US Small Business Websites

    Decorative title card illustration

    Expect to pay $200 a year for a DIY site or $3,000 to $15,000 for a professionally built one. Most small businesses land in the $3,000 to $8,000 range for the initial build, according to pricing data covering 2026. That number only covers launch, though. Hosting, maintenance, and content updates add to the total every year after.

    How Much Does a Small Business Website Cost? A Quick Snapshot

    Small business website cost breaks into five clear bands, and knowing which one fits your business saves you from either overpaying an agency or underbuilding a site that can’t support growth.

    • DIY site builders: $0 to $450 to launch, then roughly $200 to $600 a year in subscription fees, per Forbes Advisor’s cost breakdown. You do the design work yourself on platforms like Wix or Squarespace.
    • Template plus freelancer: $1,500 to $3,000 for a professional look built on a pre-made template, typically live in two to four weeks.
    • Freelance custom build: $3,000 to $5,000 for a site designed from scratch to your specs, based on median freelancer pricing from project cost data.
    • Agency build: $5,000 to $25,000, with Clutch’s pricing research showing most agency projects still land under $10,000 despite an average project cost near $38,000 across the full market. The gap comes from strategy work, project management, and testing that a solo freelancer often skips.
    • E-commerce: Add 30% to 100% on top of any of these bands. Payment processing, inventory syncing, and PCI compliance all cost money that a simple brochure site never touches.

    By the Numbers: Agency hourly rates in the US typically run $100 to $149 per hour, which explains why a 40 hour custom build project can swing from $4,000 to $6,000 before you’ve added a single plugin.

    The freelance custom band tends to be the sweet spot for service businesses that need more than a template but don’t need an in-house strategist. Agencies earn their premium when a site has to carry real weight, like lead generation forms tied to a sales pipeline or a booking system that needs to survive Black Friday traffic.

    What You’re Actually Paying For: Cost by Component

    A website quote is really eight or nine smaller costs stacked together, and knowing what belongs in each bucket lets you catch a vendor who’s padding one category to make another look cheap.

    Domain and hosting. A domain name runs $10 to $20 a year, though renewal prices sometimes jump after the first year, so ask about year-two pricing before you buy. Hosting ranges from $15 to $150 a month depending on traffic and whether you’re on shared infrastructure or a managed plan, per Forbes Advisor.

    Hands connecting network cables to server ports

    Design and development. Template customization runs $500 to $2,000. Full custom design starts around $1,500 and climbs with every added page. As a rule of thumb, expect a fixed cost for the homepage and $100 to $500 per additional page depending on how much custom layout work it needs, a useful benchmark when a quote lists per-page pricing with no explanation.

    Functionality. Basic contact forms are usually included. Booking systems, membership portals, and third-party integrations (a CRM, a payment gateway, an email platform) each add anywhere from a few hundred to a few thousand dollars depending on complexity.

    • E-commerce cart setup: $1,000 to $5,000+
    • Booking or scheduling tools add moderate costs depending on complexity.
    • Integration of CRM or email marketing features adds moderate costs based on scope.

    Content and SEO. Professional copywriting for a five to seven page site typically runs $1,000 to $3,000. Initial SEO setup (site structure, metadata, local schema) often costs $500 to $2,500 upfront, with some vendors offering ongoing SEO as a monthly retainer instead of a one-time fee. If local visibility matters to your business, pairing on-site SEO work with a near-me search strategy tends to matter more for lead volume than any design tweak.

    Security and accessibility. An SSL certificate is bundled free with most modern hosting, but some providers still charge $50 to $200 a year for premium versions. Backups and security monitoring add $30 to $100 a month. Accessibility consulting, which matters for ADA compliance risk, typically runs a few hundred to a few thousand dollars depending on how much remediation your site needs.

    Hands inspecting website security device

    Cost by Build Path: Examples, Timelines, and Trade-Offs

    Each build path forces a different trade-off between money, time, and control. Here’s what each one actually looks like in practice.

    1. DIY hosted builders. A Wix or Squarespace site can go live in a weekend. First-year cost usually lands between $200 and $450 including the platform subscription, per Forbes Advisor’s estimates. The real cost is your own time. Expect 15 to 40 hours of setup if you want the site to look genuinely professional.
    2. WordPress plus template plus freelancer. Budget $1,500 to $3,000 and two to four weeks. You own the code and content outright, which matters if you ever want to switch developers later.
    3. Freelance custom build. Hourly rates for US freelancers typically run $50 to $125 an hour, adding up to the $3,000 to $5,000 median noted in industry pricing data. Timeline runs four to eight weeks, and a good freelancer will build in at least one round of cross-browser and mobile testing before launch.
    4. Boutique agency. Budget $5,000 to $25,000 over six to twelve weeks. You’re paying for discovery calls, a dedicated project manager, conversion-focused design decisions, and often a testing phase that catches problems a solo freelancer might miss.
    5. E-commerce build. Layer $2,000 to $10,000 onto any of the above for cart integration, payment gateway setup, and inventory syncing. Recurring app subscriptions (shipping calculators, abandoned cart recovery, review widgets) commonly add $50 to $300 a month on top of the build cost, and sellers running physical inventory should also factor in storage and fulfillment fees that scale with order volume.
    6. Pro Tip: Ask every vendor for a written list of what “done” looks like before you sign anything. A quote without a deliverables list is a quote that can grow indefinitely once work starts.

      What Your Website Really Costs Over Five Years

      The build price is the smallest number on the invoice over time. Hosting, security, content updates, and app subscriptions compound every year the site stays live, and that’s where most owners underbudget.

      Typical ongoing costs break down like this:

      • Managed WordPress hosting: $25 to $100 a month, per ongoing cost benchmarks
      • Plugin and app subscriptions: $25 to $75 a month
      • General maintenance and updates typically have moderate monthly fees.
      • Backups and security monitoring: $30 to $100 a month
      • Full-service maintenance retainers: $150 to $500 a month for a typical small business site, rising for e-commerce, according to Network Solutions’ maintenance data

      By the Numbers: A $3,000 freelancer build with modest $75 a month in combined hosting, maintenance, and app fees costs roughly $7,500 over five years. A $15,000 agency build carrying a $400 a month maintenance retainer, which often includes SEO and content updates, totals closer to $39,000 over the same stretch. The cheaper build isn’t automatically the cheaper choice once you run the full five-year math, especially if the pricier build drives more leads.

      E-commerce sites push these numbers higher across the board. Payment processing fees, PCI compliance costs, and inventory app subscriptions mean e-commerce maintenance commonly runs $200 to $800 or more a month, well above a standard brochure site.

      How to Budget and Choose the Right Approach

      Before you request a single quote, decide what you can actually spend and what “finished” needs to include. That clarity is what separates a fair comparison from a bidding war based on guesswork.

      Questions to ask every vendor:

      1. Who owns the code, the domain, and the content once the project ends?
      2. What exactly is included in the deliverables list, and what counts as a change order?
      3. What’s the post-launch support window, and is there a service-level agreement for response times?
      4. How many rounds of revisions and rounds of testing are included before launch?
      5. What does the site cost to run monthly once it’s live?
      6. Red flags worth walking away from: a scope described only in vague terms (“a modern, professional site”), no written deliverables list, and no mention of a testing plan before launch. Vendors who won’t put scope in writing rarely stick to a budget once work starts.

        For budgeting, a common rule of thumb is allocating 2% to 5% of annual revenue toward website investment when the site drives a meaningful share of new business, and setting a fixed project band otherwise. Always compare quotes by deliverables, not sticker price. A $2,000 quote missing SEO setup and mobile testing isn’t actually cheaper than a $3,500 quote that includes both.

        Pro Tip: Set aside 15% to 20% of your total build budget as a running-cost reserve before you ever sign a contract. It keeps hosting and maintenance bills from becoming a surprise six months after launch.

        Why Aesthetics Aren’t the Real Cost Driver

        The biggest misread in small business website budgeting is treating price as a proxy for design quality. It isn’t. The real gap between a $1,500 template and a $10,000 custom build usually shows up in performance architecture, mobile speed, and whether the site was actually built to convert visitors into leads.

        Most owners can’t tell the difference between a fast, SEO-ready site and a slow one just by looking at it, which is exactly why so many small businesses overpay for visual polish and underinvest in the technical groundwork that drives traffic. A beautiful homepage that loads in six seconds on mobile loses visitors before they see it.

        EngageZing builds every site around measurable outcomes rather than design trends, tying scope directly to lead volume and conversion goals from the first strategy call. When a client’s goals justify it, that includes pairing the build with structured local visibility work, since a site with no local search foundation underneath it rarely earns back its cost. Businesses that treat their website as a growth asset, not a brochure, consistently see conversion gains once the technical fundamentals are in place. If you’re deciding how much to invest, start with a request your free roadmap analysis and get a number based on your actual goals instead of a guess.

        Get a Website Built Around What It Needs to Do for You

        If you’ve read this far, you already know the real question isn’t “how much does a website cost.” It’s “how much does a website that actually generates business cost.” That’s the gap EngageZing’s Winning Websites service is built to close: sites designed around your conversion goals from day one, with local account management that understands your specific market rather than a generic template stretched to fit.

        Every build starts with a clear look at where your current site is losing visitors and what a fix would realistically cost, so you’re deciding with numbers instead of guesswork. Businesses working with EngageZing have reported conversion gains as high as 4x once the technical and strategic pieces are aligned. If your current site isn’t pulling its weight, start with a roadmap analysis and see exactly where the opportunity is.

        Frequently Asked Questions

        How much does a small business website cost in 2026?

        Expect $3,000 to $8,000 for most professional builds, with a DIY option near $200 a year and enterprise work going far higher. Hosting, maintenance and content updates add to the total every year after launch.

        What ongoing costs should I budget for?

        Hosting, security, backups, plugin and licence renewals, and content updates. Over five years these routinely exceed the original build cost, which is the part most quotes do not put in writing.

        Does paying more guarantee a better website?

        No. Design quality does not track price cleanly. Technical performance, page speed, mobile experience and conversion clarity predict results better than the invoice does.

        Share This Article

        Found this useful? Send it to another owner who is still sticker-shocked by a website quote.

        Share on Facebook · Share on X · Share on LinkedIn · Share on Pinterest

        Want More Information? Let’s Talk.

        If you would rather not take this on yourself, we handle it for you. Our Winning Websites service takes care of the setup and the ongoing work, then reports back so you can see exactly what changed. You keep running your business; we keep this moving.

        Call us at 631-825-9464 or reach out here. No pressure, no obligation, and you can ask us anything — including whether this is even worth doing for a business your size.

        Looking ahead, request your free roadmap analysis and we will map out a 12-month plan to close the conversion leaky bucket so more of the customers you already reach turn into booked work.


        Written by Joe Leineke · Content on this blog is generated with AI assistance and independently reviewed and fact-checked by human marketing professionals for accuracy and quality.

  • $50–$100/Day Local Facebook Ads: Set Up Conversions API

    $50–$100/Day Local Facebook Ads: Set Up Conversions API

    Decorative title card illustration with marketing icons

    Facebook ads work for local businesses when three things line up: your unit economics can absorb the cost per customer, you track results accurately, and you fund your budget enough to exit the learning phase. Without those, even great creative fails. A practical test budget starts around $30 to $50 a day for 30 days, enough to gather the signal Meta needs to optimize.

    What To Do Right Now: A Local Facebook Ads Starter Checklist

    Before you touch the Ads Manager dashboard, get five things in order. Skipping any one of these is the most common reason local campaigns burn money without producing customers.

    • Pick one objective that matches your actual goal. If you want foot traffic, choose store visits. If you want phone calls or bookings, choose leads or messages. Do not run a campaign that mixes goals.
    • Fix your landing page or booking flow first. A slow page or a clunky appointment form will waste every dollar you spend on ads, no matter how good the targeting is.
    • Install the Meta Pixel and connect Conversions API, or confirm your CRM already talks to Meta. This is the single biggest lever for knowing if your ads are actually working.
    • Set a realistic test budget and give it 30 to 90 days. Local advertisers who plan for $1,500 to $3,000 a month tend to get more consistent results than those testing for a week and quitting.
    • Build three creative variants before launch, not one. You want at least one photo-based ad, one video or Reel, and one offer-driven ad to see what resonates with your neighborhood.

    Pro Tip: Write your first offer down on paper before you open Ads Manager. If you can’t explain the deal in one sentence to a customer standing at your counter, it’s too complicated for a scrolling Facebook feed.

    Most owners rush past step three and wonder later why their reported return on ad spend doesn’t match what actually happened in their store. That gap is fixable, and it starts with the account structure you choose next.

    Choosing the Right Campaign Objective and Account Structure

    Your objective decides how Meta spends your money, so pick it based on the actual action you want, not the vaguest version of “more customers.” A coffee shop wanting foot traffic should choose the store traffic objective, which Meta built specifically to drive people to a physical location. A dentist’s office collecting appointment requests should run leads or send traffic to a fast landing page. A boutique fielding questions about sizes and stock should use the messages objective to route conversations into Messenger or WhatsApp. Meta’s own guidance for promoting a local business breaks these paths out clearly, and picking the wrong one is one of the fastest ways to waste a test budget.

    Account structure matters almost as much as objective selection. A common mistake is splitting a small budget across six or seven ad sets, hoping to test everything at once. Each ad set needs enough volume to hit Meta’s optimization events, and spreading $30 a day across seven audiences starves every single one of them. It is almost always better to consolidate into two or three ad sets during the testing phase, then split further once you see which audience or creative direction is actually converting.

    • Match objective to outcome: store visits for foot traffic, leads or landing page for appointments, messages for conversational sales.
    • Keep testing groups few and well-funded rather than many and thin.
    • Consolidate early. Split later, once you have data.
    • Use Advantage+ campaigns when you want Meta’s automation to find winning combinations, and keep manual control when you have a very specific, tested audience you already trust.

    Advantage+ and other AI-driven automations inside Meta’s ad system have shown modest but real improvements in cost efficiency for many advertisers, though results vary by industry and creative quality. If you’re new to Facebook ads, starting with a semi-automated setup often beats over-engineering your first campaign.

    Pro Tip: If you’re not sure which objective fits, ask yourself what your team does the moment a customer responds to an ad. If they walk to your counter, choose store visits. If they fill out a form, choose leads. If they type back, choose messages.

    For businesses juggling Facebook ads alongside other channels, a broader look at local advertising options can help you decide where Facebook fits in your overall local strategy.

    Geotargeting and Radius Options That Actually Work

    Radius targeting sounds simple, but the radius you pick changes your cost per result more than almost any other setting. A five-mile radius around a single storefront works well for a bakery or a salon with a tight walk-in trade area. A twenty-mile radius makes more sense for a home services business that drives to customers. The mistake most local advertisers make is going too narrow, assuming precision equals efficiency.

    It rarely does. Audiences under roughly 100,000 people often produce higher, noisier costs per result because Meta doesn’t have enough people in the pool to optimize delivery. A sweet spot for most single-location or service-area businesses lands between 200,000 and 500,000 people, wide enough for the algorithm to work, tight enough to stay relevant.

    ZIP code and neighborhood targeting give you more control than a pure radius, particularly if your trade area follows a river, highway, or municipal border rather than a perfect circle. A service area targeting approach that layers ZIP codes onto your actual customer data usually beats a generic radius drawn on a map.

    • Storefronts with predictable walk-in traffic: radius targeting of three to seven miles works well.
    • Service-area businesses covering multiple towns: ZIP or neighborhood targeting mapped to your actual service list is more accurate.
    • Growth-stage businesses ready to scale: layer location targeting with interest and behavior signals, then build lookalike audiences from your best customers.
    • Event or limited-time promotions: use “people recently in this location” to catch visitors and commuters, not just residents.
    • Loyalty or repeat-visit offers: target residents specifically, since they’re the ones who can actually come back next week.

    Combining geography with behavioral data is where most local advertisers leave performance on the table. A radius alone tells Meta where to show your ad. Layering interests, past purchase behavior, or a lookalike built from your customer list tells Meta who within that radius is worth showing it to first.

    Creative and Messaging That Feels Local, Not Generic

    Generic stock photography is the fastest way to make a local ad feel like it came from anywhere. Real photos of your actual location, your actual staff, and your actual customers consistently outperform polished but impersonal creative, largely because Meta’s delivery system rewards ads people engage with, and people engage more with things that look real. Local relevance is a genuine structural advantage small businesses have over national brands running the same playbook everywhere.

    1. Shoot real photos on location. Your storefront, your team at work, your product in its actual setting. This costs nothing but a few minutes with a phone camera and beats a stock photo library every time.
    2. Build vertical video for Reels placements. Facebook increasingly pushes native, vertical, sound-off-friendly video into Reels feeds, so a horizontal ad built for old-school feed placements will look out of place and get skipped.
    3. Write captions that work without sound. Most people scroll with audio off. If your video’s message depends entirely on someone hearing it, you’ve lost half your audience before they read a word.
    4. Structure a clear, time-limited offer. “20% off this weekend only” outperforms vague “great deals inside” messaging because it gives people a reason to act now rather than later.
    5. Test three creative variants at once and let the data pick a winner. Watch relevance and engagement metrics closely in the first 48 to 72 hours. A high click-through rate with low engagement often signals curiosity clicks that won’t convert, while strong comments and shares usually predict a creative that will hold up over time.
    6. Neighborhood landmarks, local sports teams, or community events referenced in your ad copy also do quiet work here. A pizza shop that mentions the high school two blocks away is speaking a shared language with its actual audience, something a national chain’s ad copy simply cannot replicate.

      If you want more structured guidance on building these creative sets, EngageZing’s Facebook advertising resources walk through account setup and messaging side by side.

      What Should You Budget, and What Do Facebook Ads Cost in 2026?

      Most local businesses testing Facebook ads should plan for $50 to $100 a day during the initial learning phase, because Meta’s algorithm needs roughly 50 optimization events within a week per ad set to exit learning and stabilize costs.

      Below that threshold, campaigns tend to stay stuck in an inefficient learning state indefinitely, with costs swinging wildly day to day. Many local service businesses eventually settle into monthly budgets between $1,500 and $3,000 once they’ve moved past initial testing and want consistent, repeatable results.

      Cost benchmarks vary by objective and industry, but across sources, most advertisers currently pay roughly $0.70 to $1.75 per click, $11 to $13.50 per thousand impressions, and $20 to $45 per acquisition. Home services and healthcare businesses tend to sit at the higher end of cost-per-lead ranges because of longer sales cycles and higher lifetime value, while restaurants and retail often see lower per-click costs and respond especially well to visual, appetite-driven creative.

      The most reliable way to set your budget isn’t to copy a benchmark. It’s to reverse-engineer it from your own numbers:

      • Decide how many new customers you want per month.
      • Multiply that number by what you can afford to pay to acquire each one (your target cost per acquisition, based on margin and lifetime value, not guesswork).
      • Add 20% to 40% on top of that total to cover the testing and learning phase, where costs are naturally less efficient.

      Metro-area businesses should also expect higher CPMs during major shopping seasons like November and December, when every advertiser in the same auction is bidding for the same attention. A break-even customer acquisition cost calculated from your real margins matters more than any published benchmark, because a $45 CPA is a bargain for a med spa and a disaster for a taco stand.

      Tracking What Actually Happened: Pixel, Conversions API, and CRM Linking

      Meta’s own reporting dashboard often undercounts what your ads actually produced, particularly for businesses where the sale happens over the phone, in a booking system, or days after the click. If you’re only measuring pixel data, you’re likely missing a meaningful share of the customers your ads generated, which can make a genuinely profitable campaign look like a loser.

      The Meta Pixel tracks browser-based events like page views and form submissions, but it relies on the visitor’s browser cooperating, which is increasingly unreliable given ad blockers and privacy settings. Conversions API sends that same event data server-side instead, bypassing browser restrictions entirely. Advertisers report that server-side tracking materially improves attribution accuracy compared with pixel-only setups, especially for businesses where a booked call or an in-person visit is the real conversion event, not a webpage action.

      • Confirm your Pixel is firing correctly on every key page using Meta’s Events Manager test tool.
      • Set up Conversions API through your website platform or CRM’s native integration if one exists.
      • Link offline events, booked calls, closed sales, completed appointments, back to the original ad and campaign.
      • Reconcile your CRM’s customer count against Meta’s reported conversions monthly, not just once at setup.

      Pro Tip: If your CRM shows twice as many booked appointments as Meta reports as leads, that gap is not a mystery; it’s a signal your offline conversions aren’t connected yet.

      Advanced practitioners use Conversions API specifically to attribute booked calls and closed customers back to the exact campaign that generated them, which is the only way to know your true return on ad spend rather than a partial estimate.

      How To Optimize and Scale Without Wrecking Your Results

      Scaling too fast off noisy early data is the single most common way local advertisers destroy a campaign that was actually working. Run this weekly, not sporadically:

      1. Refresh creative every two to three weeks. Ad fatigue is real; the same audience seeing the same image for a month will click less and cost more over time.
      2. Check budget pacing daily during the first two weeks, then weekly after that, to catch overspending or underspending before it compounds.
      3. Prune audiences that aren’t converting, but wait for statistically meaningful volume, not three days of data, before cutting anything.
      4. Scale only after you see stable cost per acquisition across at least two full weeks of consistent volume, not a single good day.
      5. Test Reels placements specifically, since native vertical creative in Reels feeds often produces lower CPMs than traditional feed placements when the video actually looks native to the format.
      6. The biggest scaling mistake is doubling budget overnight. Meta’s delivery system treats a large budget jump as a new learning event, which can reset the stability you just earned. For deeper tactics on squeezing more return from an already-working account, a resource like how to get higher return on ad spend covers optimization moves worth layering on once your foundation is solid.

        Staying Inside Facebook’s Local Business Ad Policies

        Meta enforces specific rules for local business advertising that go beyond its general ad policies, and violating them can get your account flagged or your ads rejected before they ever run. Location-based claims, like promising same-day delivery in an area you don’t actually cover, are a common trigger for review. So is using address or map imagery that doesn’t match your verified business location.

        Housing, employment, and credit-related local ads fall under Meta’s Special Ad Category rules, which restrict certain targeting options like age, gender, and ZIP code precision. If your business touches any of those categories, even tangentially, check your ad type against Meta’s Special Ad Category requirements before launch, since the restrictions apply automatically once you select that category and cannot be worked around with clever targeting.

        Verified business information matters more than most owners realize. Your Page name, address, and phone number should match exactly what’s listed across your other online profiles. Mismatches between your ad’s claimed location and your Page’s listed address are a common reason ads get rejected during review, and fixing this proactively saves a frustrating back and forth with Meta’s automated review system. Reviewing Meta’s official guidance for local businesses before your first campaign launch is a faster path to approval than learning the rules through rejection notices.

        Handling the Messages and Calls Your Ads Generate

        An ad that works generates conversations, and how fast you respond to them often decides whether that lead becomes a customer or moves on to the next business in their search. Meta’s own data patterns across advertisers consistently show that response speed correlates with conversion rate on message-based campaigns, since a customer who messaged three businesses will usually book with whichever one replies first.

        Business owner answering phone at store counter

        Set up automated instant replies in Messenger to acknowledge a new conversation within seconds, even if a real response follows later. This buys you time without leaving someone wondering if their message vanished into the void. For high-volume campaigns, a basic chatbot that answers common questions, hours, pricing, availability, before handing off to a human can prevent lead drop-off during busy periods or after hours.

        Assign a specific person or rotating shift to monitor ad-generated messages daily, not just whenever someone happens to check the Page inbox. A message that sits unanswered for six hours is often a lost customer, particularly for time-sensitive categories like restaurants, salons, and repair services. If your team is already stretched thin, an AI-driven chatbot setup can handle the first layer of responses so no lead goes cold overnight.

        Track how many ad-generated conversations actually convert into bookings or sales, not just how many messages you receive. That conversion rate tells you far more about your ad’s real performance than click volume ever will.

        Turning Reviews and Social Proof Into Ad Creative

        A five-star Facebook review sitting quietly on your Page does nothing for your ad performance until you actually put it inside an ad. Social proof works because it answers the exact hesitation a stranger has when they see your business for the first time: is this place actually good, or is the ad just telling me it is?

        Screenshot genuine reviews, with permission, and drop them directly into your creative as a static image ad or as text overlay on a short video. A real customer’s words, in their own voice, consistently outperform brand copy making the same claim about quality or service. If your Page has a strong review count and rating, referencing that number directly in ad copy (“Rated 4.8 stars by over 200 customers”) gives skeptical viewers a concrete reason to trust you over a competitor they’ve never heard of.

        Video testimonials, even short, unpolished ones filmed on a phone, tend to feel more authentic than a polished production, and authenticity is exactly what makes local advertising different from a national brand campaign. If you don’t have a steady stream of reviews yet, that’s worth fixing before you lean too hard on social proof in ads. A review generation system that consistently asks satisfied customers to leave feedback gives you a growing pool of proof to draw from every time you build a new campaign.

        Rotate testimonials into your creative mix the same way you rotate any other ad variant, since even great social proof can fatigue an audience if the same review shows up in every ad for two months straight.

        What Successful Local Campaigns Actually Look Like

        The local businesses that get real results from Facebook ads share a pattern: they start with a specific, testable offer, track it accurately, and adjust based on what the data shows rather than what they assumed would work. A neighborhood restaurant running a lunch-hour offer targeted within a three-mile radius, with real photos of the actual dishes, tends to outperform the same restaurant running a vague “come try us” ad with stock imagery, simply because the offer gives people a concrete reason to act today.

        Service businesses, plumbers, contractors, salons, see the strongest results when they combine a lead-generation objective with a fast-loading booking page and Conversions API tracking connected to their scheduling software. That combination closes the measurement gap that causes so many local advertisers to misjudge whether their campaign actually worked. Without it, a business might see ten Meta-reported leads and forty actual bookings, or the reverse, and never know which number to trust.

        The common thread across working campaigns isn’t a clever targeting trick or a viral creative format. It’s consistency: a steady testing budget, creative refreshed on a schedule, and attribution connected end to end so every decision is based on what actually happened, not on Meta’s dashboard alone.

        Connecting Facebook Ads to Your CRM and Point-of-Sale System

        The final piece most local businesses skip is connecting ad performance to the systems that already run their day-to-day operations. Your CRM knows who booked an appointment. Your point-of-sale system knows who bought something. Neither of those systems talks to Meta by default, which means your ad reporting and your actual business results live in two separate, disconnected worlds unless you build the bridge yourself.

        Hand setting up CRM to Facebook ad integration

        Most modern CRM and booking platforms offer a native Conversions API integration or a Zapier-style connector that pushes offline events, a completed purchase, a booked call, a redeemed offer, back into Meta automatically. Setting this up once, at the start of your campaign, saves months of manually cross-referencing spreadsheets to figure out whether last month’s spend actually paid off.

        Point-of-sale integration matters especially for retail and restaurant businesses running in-store offers promoted through ads. Linking a redeemed discount code or a scanned offer at checkout back to the specific campaign that generated it tells you, with actual certainty, which ad drove a real purchase rather than just a click. Without that link, you’re left guessing whether foot traffic increased because of your ad or because of an unrelated local event that happened the same week.

        Businesses juggling both digital ads and physical listings often benefit from making sure their business listings stay accurate across the web, since inconsistent address or hours information can quietly undermine the trust an ad just built.

        Why Most Local Businesses Get the Budget Question Backwards

        Here’s what I’ve noticed reviewing local ad accounts: owners obsess over targeting radius and creative style, then treat budget as an afterthought, usually whatever’s left over after everything else is decided. That order is backwards. Budget should come first, because it determines whether you’ll ever collect enough data to know if anything else you’re doing actually works.

        At EngageZing, we structure local campaigns around measurement first, objective second, creative third, specifically because the businesses that skip straight to “let’s make a cool ad” almost always end up unable to explain why it did or didn’t work. Our AI-driven operations tools connect ad performance to real business outcomes, and clients working with this structured approach have reported gains of up to four times their prior conversion rates once measurement gaps get closed and creative gets tested systematically rather than guessed at.

        The uncomfortable truth is that most local businesses aren’t failing at Facebook ads because the platform doesn’t work. They’re failing because they never built the tracking infrastructure to know if it does.

        Frequently Asked Questions

        How much should a local business spend on Facebook ads per day?

        Plan on $50 to $100 a day for at least 30 days. Below that the ad set struggles to exit the learning phase and the data stays too thin to optimize against.

        What is the Conversions API and why does it matter?

        It is Meta’s server-side tracking connection. It sends real bookings and sales from your CRM or calendar to Meta, so the algorithm optimizes against revenue instead of guesses, especially after browser tracking limits kicked in.

        What audience size works best for local campaigns?

        A radius target under 100,000 people tends to raise costs. 200,000 to 500,000 gives the algorithm enough room to find buyers while staying local.

        Share This Article

        Found this useful? Send it to another owner who is still burning budget with no tracking to show for it.

        Share on Facebook · Share on X · Share on LinkedIn · Share on Pinterest

        Want More Information? Let’s Talk.

        If you would rather not take this on yourself, we handle it for you. Our Facebook Advertising service takes care of the setup and the ongoing work, then reports back so you can see exactly what changed. You keep running your business; we keep this moving.

        Call us at 631-825-9464 or reach out here. No pressure, no obligation, and you can ask us anything — including whether this is even worth doing for a business your size.

        Looking ahead, request your free roadmap analysis and we will map out a 12-month plan to close the conversion leaky bucket so more of the customers you already reach turn into booked work.


        Written by Joe Leineke · Content on this blog is generated with AI assistance and independently reviewed and fact-checked by human marketing professionals for accuracy and quality.

  • Chatbot Lead Generation: What Actually Works in 2026

    Chatbot Lead Generation: What Actually Works in 2026

    Decorative digital marketing title card illustration

    Yes, a properly built lead-generation chatbot increases qualified lead volume and cuts time-to-contact by delivering value before it asks for a name and email. Conversational chatbots typically convert 15 to 25% of engaged visitors into leads versus 2 to 5% for static forms. That works best on high-intent pages with clear qualification logic behind it, which the sections below break down: architecture, flow design, scoring, and the integration details that make or break the handoff to sales.

    What Types of Lead Generation Chatbots Should You Use?

    Not every chatbot is built the same way, and picking the wrong architecture for your traffic volume wastes both budget and engineering time. Three broad approaches dominate the market right now, and each fits a different business size and complexity level.

    Rule-based chatbots follow decision trees. You script every path in advance: “Are you looking for pricing or support?” leads to two fixed branches. They’re cheap to build and easy to maintain, but they break the moment a visitor asks something outside the script.

    LLM and RAG-based chatbots use retrieval-augmented generation to pull answers from your own documentation, product pages, and pricing sheets. This grounding is what makes them safe enough for pricing and product questions without hallucinating a wrong number to a prospect. They cost more to set up and need ongoing content maintenance, but they handle open-ended conversation far better than a script ever could.

    Hybrid agent models combine scripted qualification logic with LLM flexibility, escalating to a human when confidence drops. For most mid-size businesses, this is the sweet spot: predictable on the questions you can anticipate, flexible on the ones you can’t.

    Channel choice matters just as much as the underlying model:

    • Website embed widgets work well on pricing and demo pages where intent is already high.
    • Messaging apps like WhatsApp suit businesses with international customers or younger audiences who never check email.
    • Conversational landing pages replace a static form entirely and tend to hold attention longer than a widget tucked in the corner.

    Maintenance costs scale with sophistication. A rule-based bot might need an hour of tweaking a month. An LLM-based one needs someone watching transcripts, updating the knowledge base, and retraining prompts as your product changes.

    How Do Lead Generation Chatbots Actually Convert Visitors?

    The mechanics behind a high-converting chatbot come down to sequencing. Ask for information too early and visitors bounce. Deliver value first, and they stick around long enough to qualify themselves.

    1. Value before data. The bot answers a real question, points to a relevant resource, or gives a quick quote estimate before requesting anything in return.
    2. Progressive profiling. Instead of a five-field form, the bot asks one question at a time. Name and use case first. Budget and timeline later, once trust is established.
    3. Behavioral or contextual triggering. Instead of firing a popup after 10 seconds on every page, the bot triggers when a visitor lingers on a pricing table or scrolls past a case study, which signals real buying intent.
    4. Real-time scoring. Each answer adds or subtracts points based on fit criteria you define, like company size, urgency, or budget range.
    5. Handoff to sales. Once a lead crosses a scoring threshold, the bot packages the conversation, score, and contact details and routes it to the right rep or queue.
    6. Contextual triggers tuned to page-level intent consistently outperform generic time-based popups for both conversion rate and how visitors feel about the interaction. Nobody likes being interrupted by a chat window three seconds after landing on a homepage.

      A handoff package that actually helps sales close needs more than a name and phone number. It should include the full transcript, the calculated lead score, the specific pages the visitor viewed, and the qualifying answers they gave. Reps who receive that context close faster than reps working from a bare contact form submission, because they walk into the first call already knowing what the prospect wants.

      Hands sorting chatbot lead handoff materials

      Pro Tip: Log the exact question that triggered the highest drop-off in your flow. That single data point usually tells you more about where to fix your script than a week of aggregate analytics.

      Where Should You Deploy a Chatbot for the Best ROI?

      Not every page deserves a chatbot. Deploying one everywhere dilutes your engineering effort and annoys visitors who just want to read a blog post in peace. Focus on pages where intent is already elevated.

      • Pricing pages. Visitors here are comparing costs and often have a specific budget question a static FAQ can’t answer.
      • Demo request pages. A bot can pre-qualify before a rep ever gets on a call, saving your sales team from wasted meetings.
      • Checkout or signup flows. Cart abandonment often comes down to one unanswered question; a bot can catch it in the moment.
      • Knowledge base and support pages. Visitors who came to solve a problem are often also evaluating whether to buy, and a well-placed prompt can convert a support session into a sales conversation.

      Expectations vary by industry. A B2B software company selling a $10,000 annual contract will see longer, more detail-heavy chatbot conversations than a local service business quoting a $200 repair job. Set your benchmark against your own funnel, not a generic average.

      Multi-channel capture widens the net. A chatbot embedded only on your website misses the visitor who found you through a Facebook ad and prefers messaging over browsing a full site. Layering chat into WhatsApp or Facebook Messenger, alongside your business listings and voice search presence, captures leads at the moment they’re already engaged rather than hoping they navigate to a contact page later.

      Smartphone used for multi-channel chatbot messaging

      How Do You Design a Chatbot Qualification Flow?

      Sales-ready leads come from asking the right questions in the right order, not from a bot that just collects an email address as fast as possible. Two frameworks give you a reliable script structure.

      BANT (Budget, Authority, Need, Timeline) maps cleanly to a short conversational sequence: confirm the visitor’s problem first, then probe budget range, then ask who else is involved in the decision, then pin down urgency. MEDDIC (Metrics, Economic Buyer, Decision Criteria, Decision Process, Identify Pain, Champion) works better for complex B2B sales where multiple stakeholders are involved and a single bot conversation needs to surface who the economic buyer actually is.

      A workable question order looks like this:

      1. Open with the visitor’s problem or goal, not a form field.
      2. Offer a piece of value, like a resource or estimate, based on their answer.
      3. Ask a soft qualifying question (team size, use case, industry).
      4. Request contact details only after two or three value exchanges.
      5. Ask budget and timeline questions last, once trust is established.
      6. Score the conversation and route accordingly.
      7. Scoring thresholds should map directly to routing actions. A lead scoring above 80 out of 100, say, with confirmed budget and near-term timeline, routes to a live rep notification within minutes. A lead in the 40 to 79 range enters a nurture sequence with a follow-up email. Anything below 40 stays in a general newsletter list rather than clogging your sales queue.

        Human escalation logic matters just as much as the score itself. If a visitor asks a legal, contractual, or highly technical question the bot can’t confidently answer, escalate immediately rather than guessing. The handoff should carry the full transcript, score, and flagged escalation reason so the human picking it up isn’t starting from zero.

        What Integrations Does a Lead Generation Chatbot Need?

        A chatbot that doesn’t talk to your CRM is just an isolated island of good conversations nobody in sales ever sees. Integrations that sync chatbot data to your CRM in real time correlate with higher lead-to-opportunity conversion, because reps act on fresh information instead of a batch export from last week.

        Fields that must flow bidirectionally include contact details, lead score, qualifying answers, source page, and timestamp. Enterprise deployments often lean on API-driven middleware, and MuleSoft’s case studies show how chatbots plug into larger workflow systems that span support, sales, and billing.

        Watch for these common pitfalls:

        • One-way sync. The bot pushes data to the CRM but never receives updates back, so a rep marking a lead “closed lost” doesn’t stop the bot from re-engaging them.
        • No real-time enrichment consent. Pulling company data or firmographic details without disclosing it in your privacy policy creates compliance exposure, particularly under GDPR or CCPA depending on your visitor’s location.
        • Notification overload or silence. Sales teams either get pinged for every single conversation or miss hot leads entirely because the notification channel isn’t monitored. Set a clear SLA, like a 15-minute response window for hot leads routed to Slack or SMS, and stick to it.
        • Duplicate contact records. Without a matching rule keyed to email or phone, every new chat creates a fresh CRM record instead of updating the existing one.

        Getting this right takes deliberate setup work, which is where a managed integration through something like AiGent360 removes the guesswork of stitching multiple systems together yourself.

        How Do You Measure and Improve Chatbot Performance?

        Three KPIs matter more than the rest: conversation-to-lead rate, lead-to-opportunity rate, and average time-to-first-contact. Calculate conversation-to-lead rate by dividing completed qualification flows by total conversations started. Track lead-to-opportunity separately in your CRM, since that’s the number that actually reflects sales value, not just chatbot activity.

        | KPI | How to calculate it | Why it matters |

        |—|—|—|

        | Conversation-to-lead rate | Leads captured ÷ conversations started | Shows flow effectiveness |

        | Lead-to-opportunity rate | Opportunities created ÷ leads passed to CRM | Shows lead quality, not just volume |

        | Time-to-first-contact | Timestamp of handoff to timestamp of first rep touch | Shows how fast sales acts on hot leads |

        A best-practice testing cadence runs weekly transcript reviews for the first month after launch, then fortnightly through months two and three, then monthly once the flow stabilizes. Watch for the specific question where drop-off spikes, and A/B test one variable at a time: the opening question, the point where you ask for an email, or the tone of the value offer.

        Set targets against your own baseline first. Businesses running chatbots correctly report 20 to 35% more leads than they generated with forms alone, and EngageZing clients have seen conversion gains as high as 4x after a properly scoped rebuild of their capture flow.

        What Should Your Chatbot Implementation Checklist Include?

        Launching without a checklist is how teams end up with a chatbot nobody trusts three months in. Work through this order.

        1. Define one clear goal. Lead volume, lead quality, or support deflection, not all three at once.
        2. Document your ideal customer profile. Scoring rules are meaningless without a target to score against.
        3. Pick two or three pages for initial deployment. Pricing and demo pages first, expand later.
        4. Set your baseline KPIs before launch. You can’t measure improvement without a starting number.
        5. Run an integrated test of the full handoff, from first message to CRM record, before going live.
        6. For the first 30 days, review transcripts daily and fix obvious script gaps. Days 30 to 60, run your first A/B test on the opening question. Days 60 to 90, tighten scoring thresholds based on actual sales feedback on lead quality.

          The most common failure mode is asking for contact details before delivering any value, which spikes abandonment in the first exchange. The fix is simple: always answer or offer something first. The second most common mistake is no escalation path, leaving confused visitors stuck talking to a bot that can’t help them. Build the human handoff in from day one, not as an afterthought once complaints start. Review your scoring rules quarterly, since what counted as a hot lead at launch may shift as your product or pricing changes, and pair that with the improvements a stronger website foundation brings to the pages the bot sits on.

          How Does EngageZing Build and Measure Lead-Gen Chatbots?

          EngageZing builds chatbot lead generation programs the same way it builds every campaign: with a local account manager who understands your specific market, not a generic template dropped onto your site. The agency’s AiGent360 and Ai Agent solutions handle the setup, integration, and ongoing tuning that most in-house teams don’t have time for.

          Typical engagement includes:

          • A qualification flow scripted around your actual sales process, not a generic template.
          • CRM integration so every scored lead lands where your sales team already works.
          • Weekly transcript reviews in the first month, tapering to monthly check-ins once performance stabilizes.
          • Shared KPI reporting tied to lead volume and conversion, the same metrics covered above.

          Clients working with EngageZing on AI-driven capture and review generation together have reported conversion gains up to 4x. Combined with AI-driven review and sales support, the chatbot becomes one piece of a broader system built to turn visitors into booked appointments. A free analysis at roadmap.engagezing.com is the fastest way to see where your current setup stands.

          What Tradeoffs Actually Matter When You Build One of These?

          Everyone wants a chatbot that feels human and converts like a top-tier sales rep. In practice, you’re always trading speed for depth. A rule-based bot answers instantly but breaks on nuance. An LLM-based one handles nuance but needs real maintenance, or it drifts into vague or wrong answers within weeks.

          The tradeoff people underestimate most is automation versus human touch. Full automation looks efficient on a dashboard, but the leads that matter most, the ones with complex needs or big budgets, usually want a human at some point in the process. Build the escalation path before you need it, not after a frustrated prospect walks.

          Three things to do this week: pull your last 50 form submissions and see what percentage never got a reply within an hour, audit your pricing page for a single unanswered question a bot could catch, and write down the one qualifying question your sales team always wishes they’d asked sooner.

          Ready for a Free Chatbot and Lead Generation Analysis?

          EngageZing is the alternative to hiring a full internal team to build and babysit a chatbot. You get a program scripted around your actual sales process, tied to your CRM, and reviewed on the same weekly-to-monthly cadence covered above, without the in-house engineering overhead of maintaining an LLM pipeline yourself.

          If you sell a complex service with a longer sales cycle, AiGent360 sets up the qualification logic and integrations for you. If you run a local business chasing faster response times, EngageZing’s Ai Agent solution paired with business listings and voice search management widens where leads can reach you in the first place. Every engagement starts with shared KPIs, so you know exactly what “working” looks like before the first script is written.

          Get a free analysis at request your free roadmap analysis and see exactly where your current lead capture is leaking opportunity, and what a properly scoped chatbot program would look like for your business.

          Frequently Asked Questions

          Do website chatbots actually generate leads?

          Yes, when they are built with clear qualification logic and deployed on high-intent pages. Engaged visitors convert at 15-25% into leads versus 2-5% for a static form.

          Where should a lead-gen chatbot live on my site?

          On the pages where intent is already high: pricing, quotes, booking and contact pages. A chatbot on a blog post mostly adds friction where there was none.

          Should the chatbot hand off to a human?

          Always. Scripted flows qualify, the AI handles open questions, and a human takes over the moment the visitor shows buying intent or asks something the flow cannot answer.

          Share This Article

          Found this useful? Send it to another owner who is still losing after-hours visitors who never fill in a form.

          Share on Facebook · Share on X · Share on LinkedIn · Share on Pinterest

          Want More Information? Let’s Talk.

          If you would rather not take this on yourself, we handle it for you. Our 4X Conversions service takes care of the setup and the ongoing work, then reports back so you can see exactly what changed. You keep running your business; we keep this moving.

          Call us at 631-825-9464 or reach out here. No pressure, no obligation, and you can ask us anything — including whether this is even worth doing for a business your size.

          Looking ahead, request your free roadmap analysis and we will map out a 12-month plan to close the conversion leaky bucket so more of the customers you already reach turn into booked work.


          Written by Joe Leineke · Content on this blog is generated with AI assistance and independently reviewed and fact-checked by human marketing professionals for accuracy and quality.